Running headers, footnotes, stuff in margins and so on.
Margin boxes of a page
A page box consists of two types of area: page area and page margin boxes.
The page area is the content area of a page box. It is the space into which all your HTML content will flow. When this content runs out of room, another page will be automatically created. It's what the chunker part of Paged.js do.
The margins of a page are divided into sixteen boxes where you can put generated content like page number and running heads. These boxes are called margin boxes.
Each have its own margin, border, padding, and content areas. By default, their sizes are determined by the margin of the page box.
The figure bellow represent the sixteen margin boxes of a page defined by the W3C:
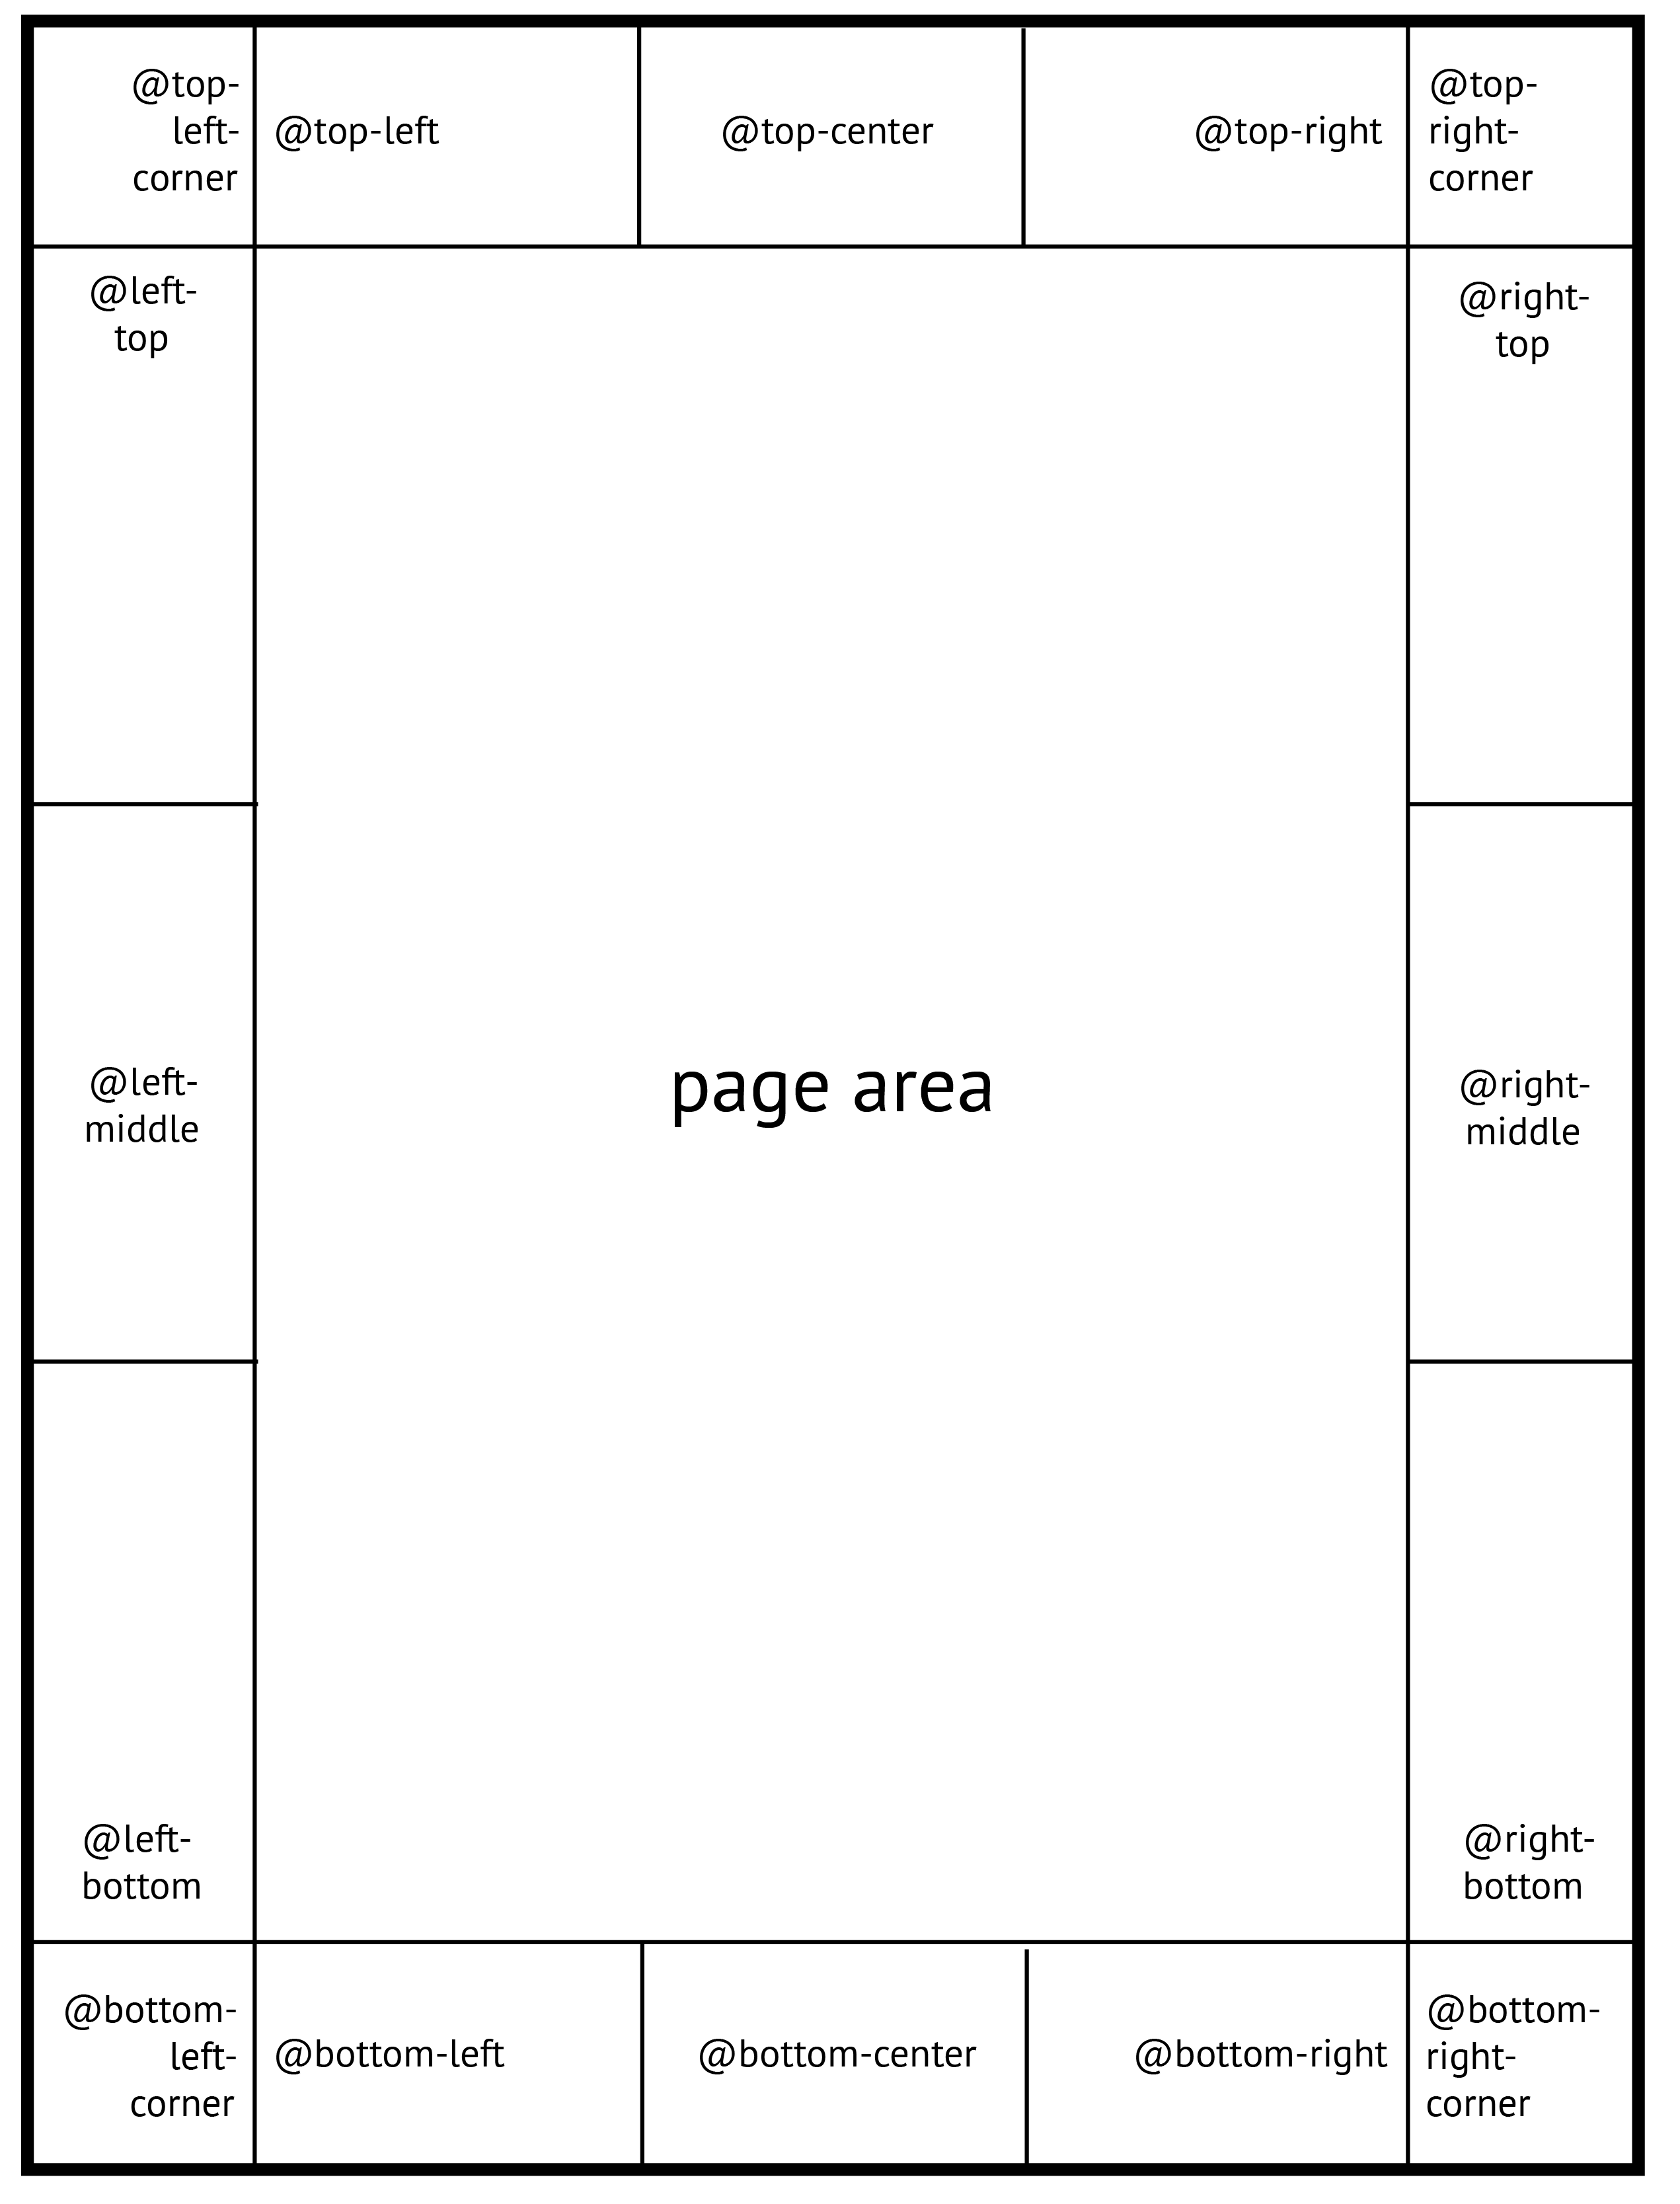
You can select this margins boxes in the @page rules with rules such as @top-left, @bottom-right-corner, @left-middle, etc. You add content in a page-margin box with the content property.
The code below put your title in the @top-right margin box of all right pages:
@page: right {
  @top-right {
    content: "My title";
  }
} ;
List of the margin boxes:
@top-left-corner {
}
@top-left {
}
@top-center {
}
@top-right {
}
@top-right-corner {
}
@left-top {
}
@left-middle {
}
@left-bottom {
}
@right-top {
}
@right-middle {
}
@right-bottom {
}
@bottom-left-corner {
}
@bottom-left {
}
@bottom-center {
}
@bottom-right {
}
@bottom-right-corner {
}
Page Counter
To define page numbers, Paged.js uses a CSS counter that gets incremented for each new page.
To insert a page number on a page or retrieve the total number of pages in a document, the W3C proposes a specific counter named page. The counters declaration must be used within a content property in the margin-boxes declaration. The following example declares the page number in the bottom-left box:
@page {
  @bottom-left {
    content: counter(page);
  }
}
You can also add a bit of text before the page number:
@page {
  @bottom-left {
    content: "page " counter(page);
  }
}
To tally the total number of pages in your document, you can write this:
@page {
  @bottom-left {
    content: "Page " counter(page) " of " counter(pages);
  }
}
Reset the page counter
Right now, reseting the page count to 1 is the only possible options. Check Issue #31 to keep track of that option.
Named String: classical running headers/footers
The fastest way to create running headers/footers is to use what is already in your content. Named strings are used to create running headers and footers: they copy text for reuse in margin boxes.
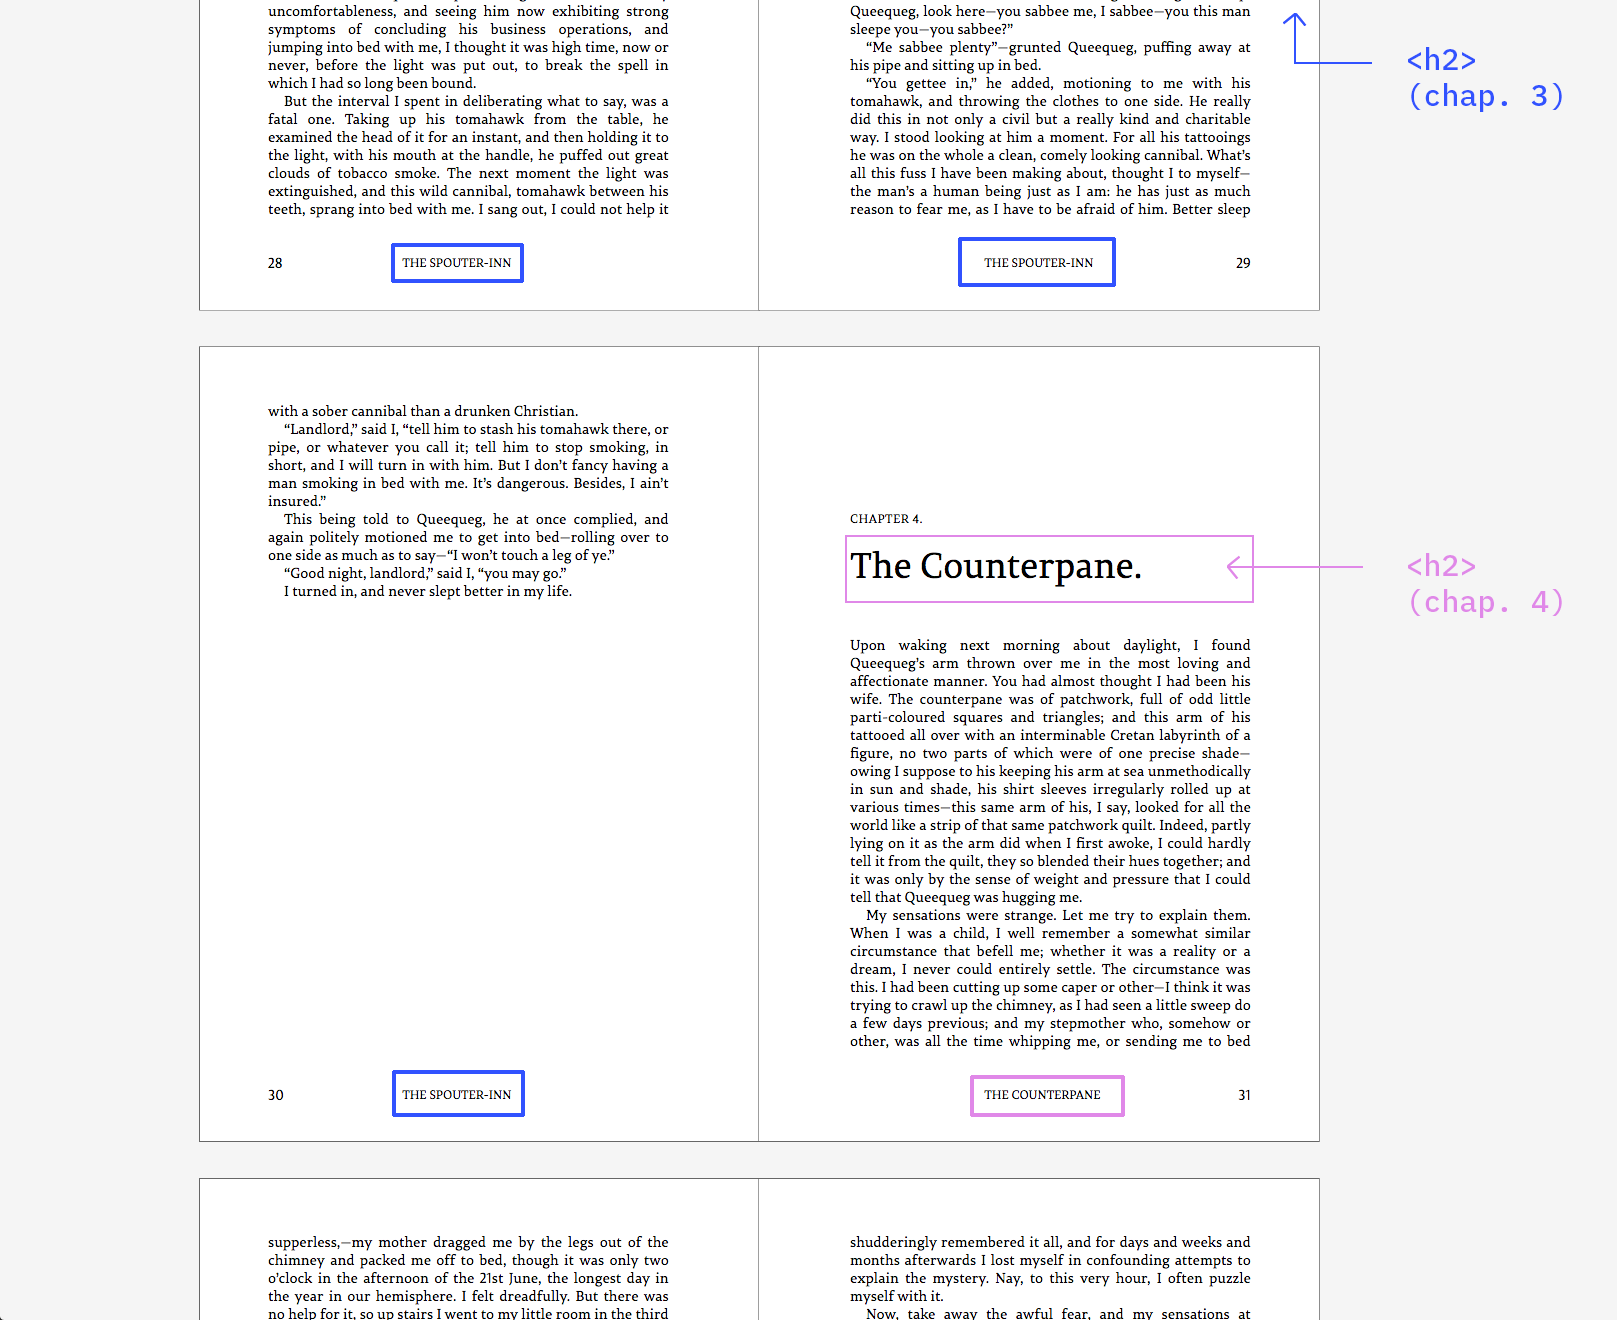
First, the text content of the selected element is cloned into a named string using string-set with a custom identifier (in the code below we call it “title”, but you can name it whatever makes sense as a variable). In the following example, each time a new <h2> appears in the HTML, the content of the named string gets updated with the text of that <h2>. (It also can be selected with a class if you prefer).
h2 {
  string-set: title content(text);
}
Next, the string() function copies the value of a named string to the margin boxes, via the content property.
@page {
  @bottom-center {
    content: string(title);
  }
}
The string property act like a variable. It read your DOM and each time a new title level 2 is encountered, it change the variable from the page where that title appears. This variable is passed into the margin boxes of the page and into all the following margin boxesuntil there is a new title.
Select content of string-set
This part don't work correctly in Paged.js for now. Issues #45, #42
The documentation need to be finish.
You can specify which part of the element you want to select to construct the value of the named string. This argument is obligatory.
string-set: <identifier> content(text):
string value of the element (default value)string-set: <identifier> content(first-letter):
first letter of the element (as defined for the::first-letterpseudo-element )string-set: <identifier> content(before):
string value of the::beforepseudo-elementstring-set: <identifier> content(after):
string value of the::afterpseudo-elementstring-set: <identifier> attr(<identifier-attr>):
returns the string value of the attribute define by an attribute identidier (data-attribute,href,title...)
It's possible to define multiple value in the same string-set.
Sample:
h2::before {
  content: "Chapter " counter(countChapter, upper-roman);
}

h2 {
  string-set: titleBefore content(before), title content(text);
}

@page {
  @bottom-center {
    content: string(titleBefore) ". " string(title, first);
}
Styling named string
The content is copied, so to stylize it you have to apply the styles directly in the margin box.
For example, if you want to capitalize your title and give it a size of 11px:
@page {
  @bottom-center {
    content: string(title);
    text-transform: uppercasse;
    font-size: 11px;
  }
}
This is the DOM created when a named string is "called" into a margin box:
<div class="pagedjs_margin pagedjs_margin-bottom-center hasContent">
  <div class="pagedjs_margin-content">::after</div>
</div>
The content of the margin box is insert into the contentproperty of the ::after pseudo-element of the div element with “pagedjs_margin-content” class.
You can also use this class and ::after pseudo element for styling.
Running elements: headers/footer with specific (complex) content
There are cases where the use of string-set is not suitable for specific or complex running headers and footer. For example, if you need:
- to keep the HTML tags contained in the header/footer (
<em>,<span>,<br>…), - to insert images or pictograms in the header/footer (with
<img>or<svg>), - to shorten a title that is too long and do that in semantically way (do not use the
text-overflow: ellipsis;property but replace the title with a piece that means), - to repeat complex elements (adress, contact…) on all pages for document like invoices or reports.
For this you can use running elements with position property and element() function. The position property removes the element from the normal flow (instead of copying it like string-set property) and moves it to the margin boxes using the element() function.
This technique allows you to keep all the HTML structuring of the element. But you must add dedicated elements in your HTML.
In the following example, we want to keep the italics contains in the title.
<section id="chapitre-4">
  <h1>The protagonist of <em>Macbeth<em></h1>
  <p><em>Macbeth</em> is a tragedy by William Shakespeare; it is thought to have been first performed in 1606. It dramatises the damaging physical and psychological effects of political ambition on those who seek power for its own sake...</p>
</section>
First, add dedicated element for running title in your HTML (just after the title) and copy your title inside. Here, it is a paragraph with the class .title.
<section id="chapitre-4">
  <h1>The protagonist of <em>Macbeth<em></h1>
  <p class="title">The protagonist of <em>Macbeth<em></p>
  <p><em>Macbeth</em> is a tragedy by William Shakespeare; it is thought to have been first performed in 1606. It dramatises the damaging physical and psychological effects of political ambition on those who seek power for its own sake...</p>
</section>
After, set the element’s position to running. Here, “titleRunning” is a custom identifier, you can name it whatever makes sense to you.
.title {
  position: running(titleRunning);
}
Then, place the element into a margin box with the element() function via the content property:
@page {
  @top-center {
    content: element(titleRunning);
  }
}
The .title element is now removed from you flow and repeted into top-center margins of pages. It's act like the named string, if a new .title element is encountered in the the DOM, the element is changed in the new page and the next ones.
Note: The element() function cannot be combined with other possible values for the content property.
Styling running elements
Since the element is copied, all styles are copied with it. That is, if you have stylized your .title element, the styles will be kept in the margins.
With the following code, your running header will appear in capital letters and with a size of 11px:
.title {
  position: running(titleRunning);
  text-transform: uppercasse;
  font-size: 11px;
}

@page {
  @top-center {
    content: element(titleRunning);
  }
}
This is the DOM created when you move a running element into a margin:
<div class="pagedjs_margin pagedjs_margin-top-center hasContent">
  <div class="pagedjs_margin-content">
    <p class="title">The protagonist of <em>Macbeth<em></p>
  </div>
</div>
You can see that the paragraph is kept in the margin as well as all its content. You can apply styles on the paragraphe or on the margins because of cascading.
Select element of the page for running title/headers
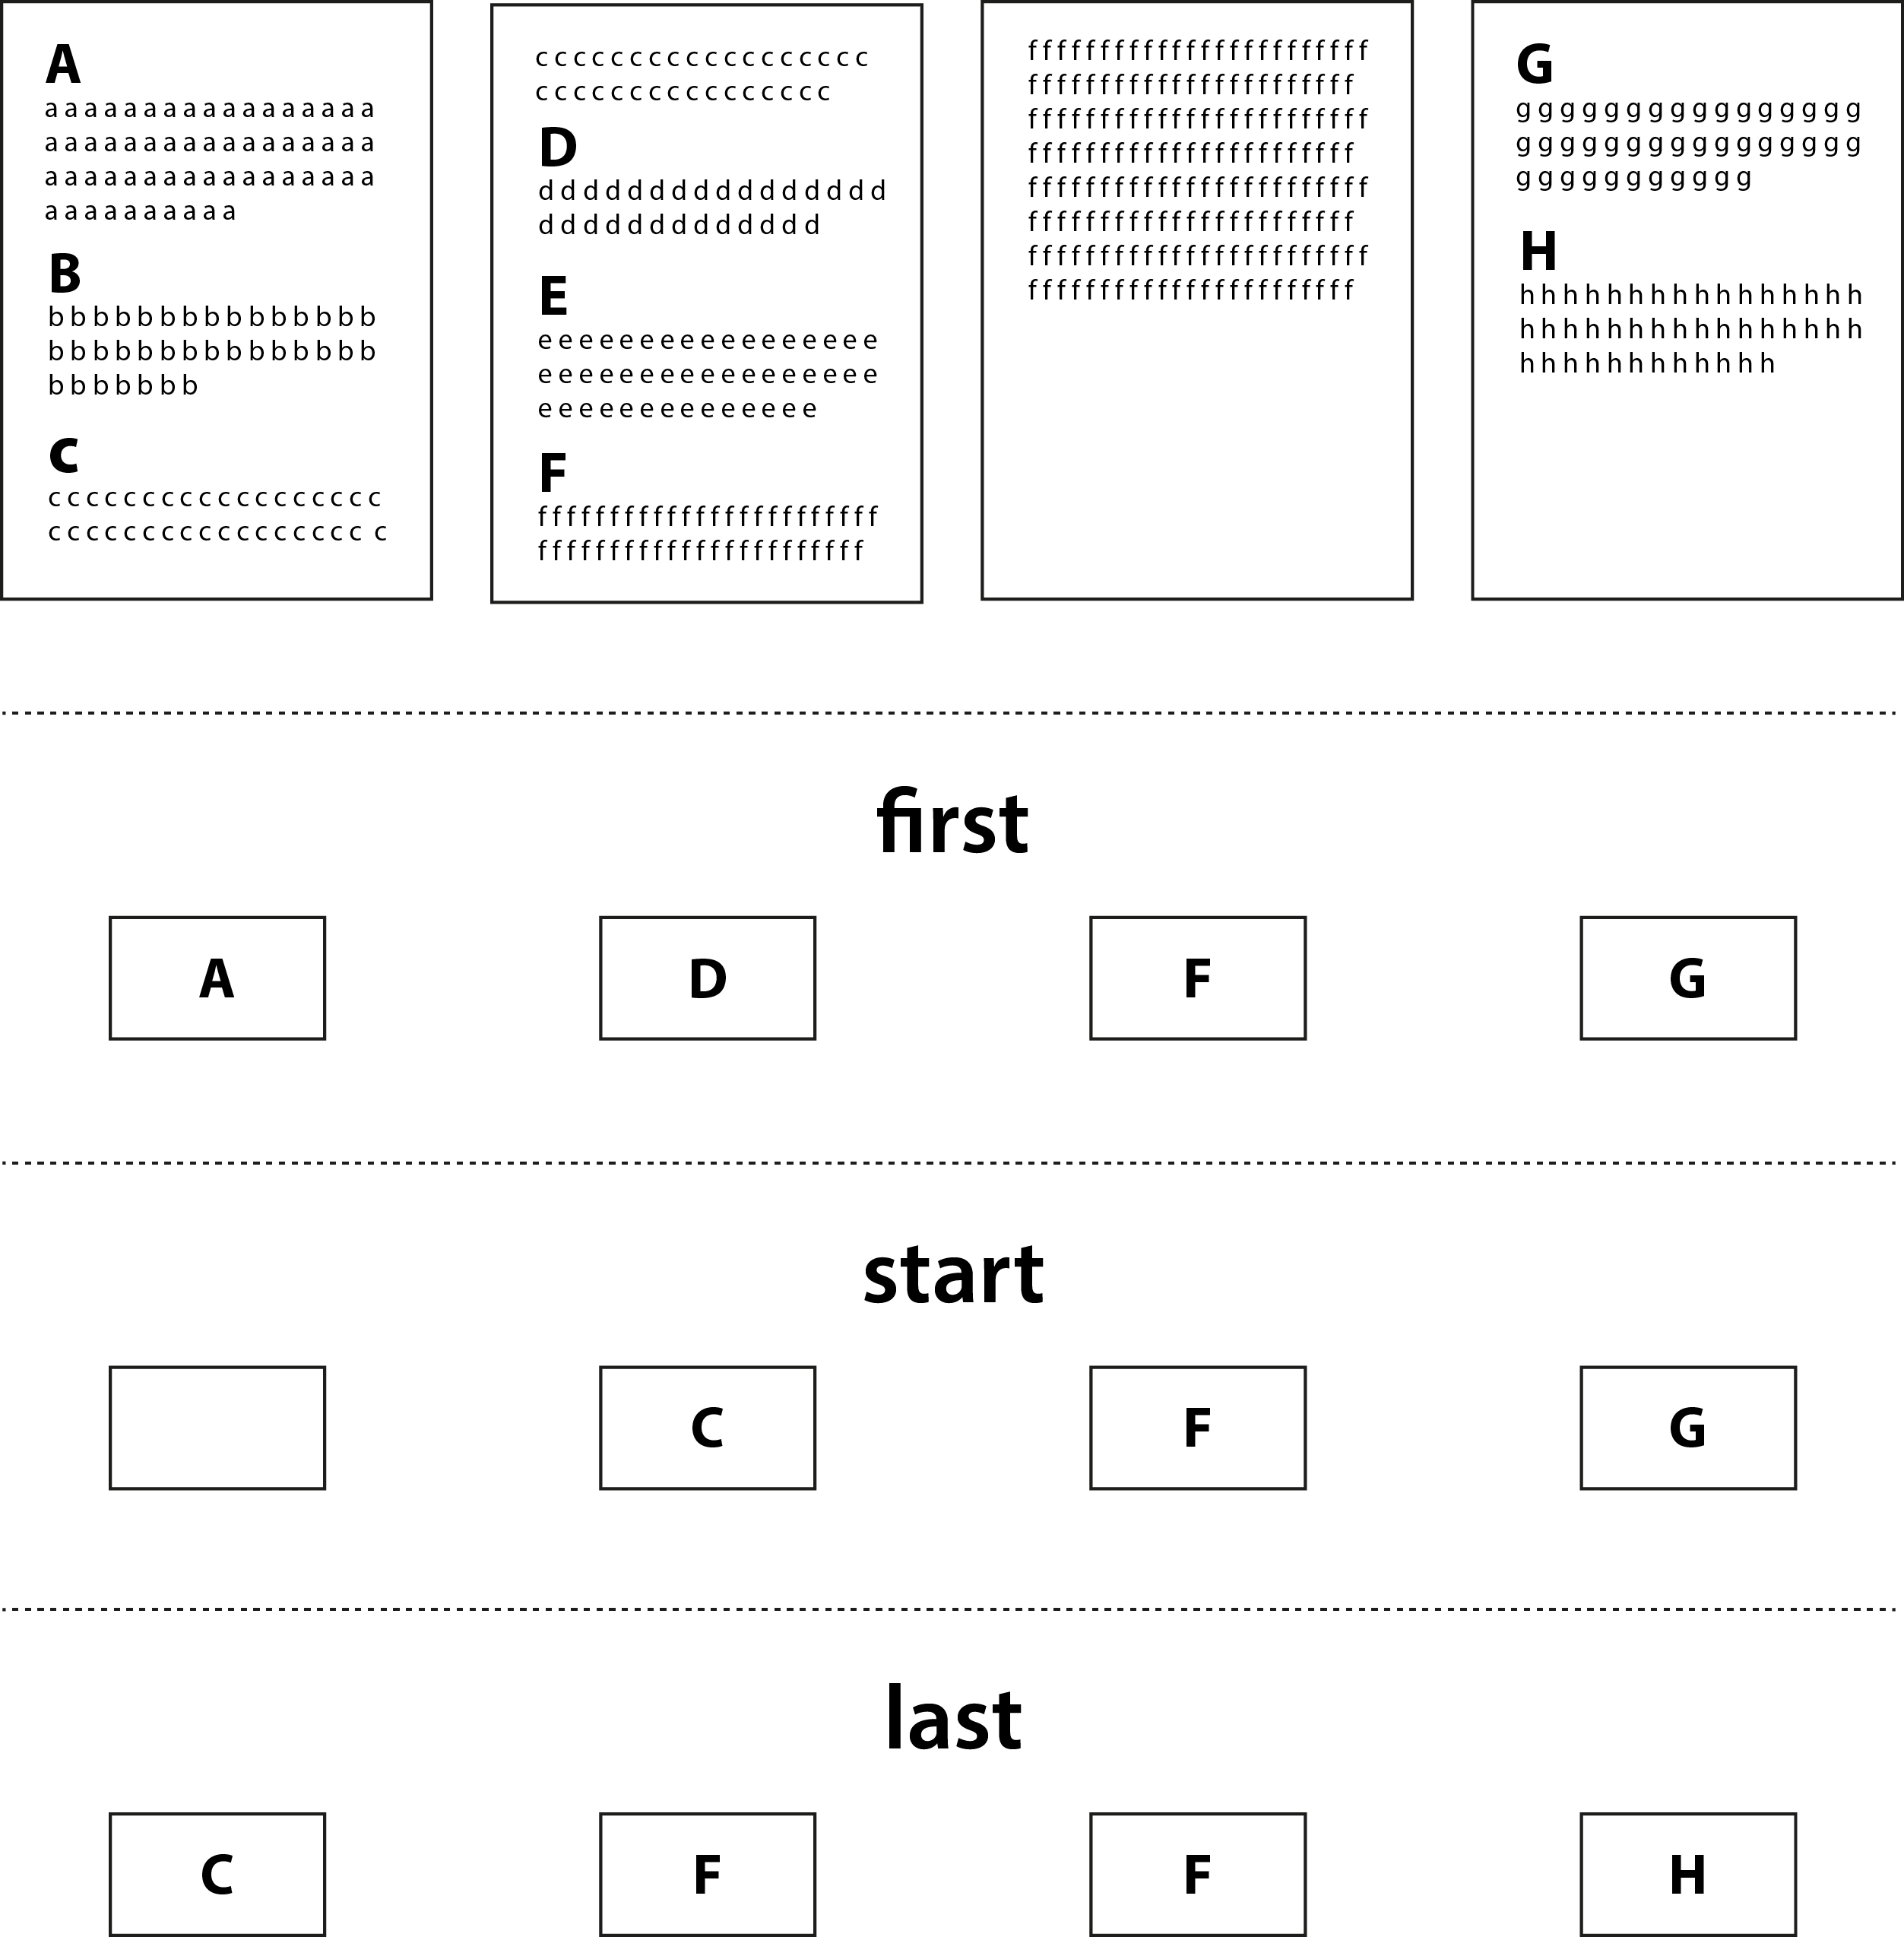
The value of a named string or the value of a running element may change several times on a page (for exemple if you have multiple title of the same level in the same page). You can add a second optional argument on the string() function or on the element() function to indicates which element of the page should be used if there is multiple. This argument specify the value of the named string. Can be combined with other possible values for the content property.
string(<identifier>, first):
Use the value of the first assignment on the page (default)string(<identifier>, start):
Use the value assigned at the start of the page. If the element is the first element on the page, it's this one. If not, it's the element of the previous page.string(<identifier>, last):
Use the value of the last element on the page.string(<identifier>, first-except):
If the value is assigned on the page, the running element don't appears on this page but appears on next pages.
The first three argument are usefull for dicitonnary or glossary. The figure below shows which value appears according to the argument:
Delete generated content in blank page
Forced page breaks can create blank page, e.g., pages automatically added to make sure a new chapter begins on the desired left or right page. The :blank pseudo class selector selects pages that have no content from the flow. To delete the generated content in blank page, simply use content: none in selected margin boxes of the blank pages.
@page: blank {
  @top-left {
    content: none;
  }
} ;
Styling margin boxes and generated content
You can stylize the margin-boxes by applying styles directly into the at-rules for page-margin boxes.
@page {
  @top-left {
    content: "My title";
    padding-left: 15mm;
    color: #ff5733;
  }
}
Default alignement of generated content
Each margin box have default alignements for the content (show in the following table). You can easy change it by using text-align and vertical-align properties into at-rules for page-margin boxes.
table of default alignment
| Margin box | text-align |
vertical-align |
|---|---|---|
| @top-left-corner | right | middle |
| @top-left | left | middle |
| @top-center | center | middle |
| @top-right | right | middle |
| @top-right-corner | left | middle |
| @left-top | center | top |
| @left-middle | center | middle |
| @left-bottom | center | bottom |
| @right-top | center | top |
| @right-middle | center | middle |
| @right-bottom | center | bottom |
| @bottom-left-corner | right | middle |
| @bottom-left | left | middle |
| @bottom-center | center | middle |
| @bottom-right | right | middle |
| @bottom-right-corner | left | middle |
Applying style on generated content
You can specify that some CSS rules only apply to your margin box while others apply to your generated content. It depends on how you created your generated content.
With position: running()
If you have used position: running, the styles applying to the generated content must be declared in the running element and the styles applying to the margin box in the at-rules for page-margin boxes.
.running {
  position: running(chapTitle);
  font-size: 12px;
  text-transform: uppercase;
}

@page: left {
  @top-left {
    content: element(chapTitle);
    vertical-align: top;
    padding-top: 24px;
  }
} ;
With string-set
If you have used string-set, all styles are declared in the margin box and therefore applied to the margin box. If you want certain rules to apply only to the text and not to the entire margin box, you will have to use the classes created by Paged.js to reach the text.
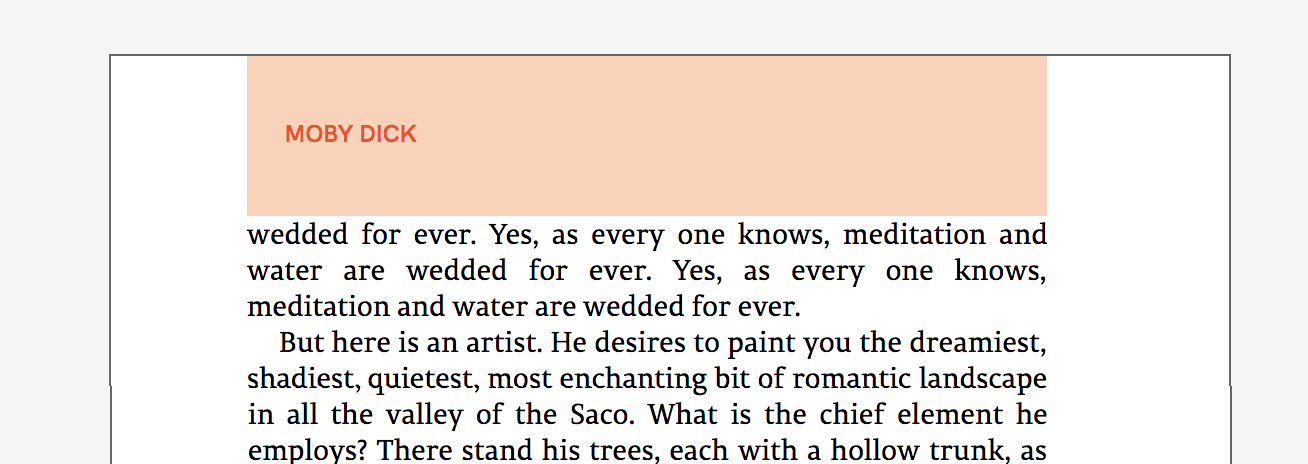
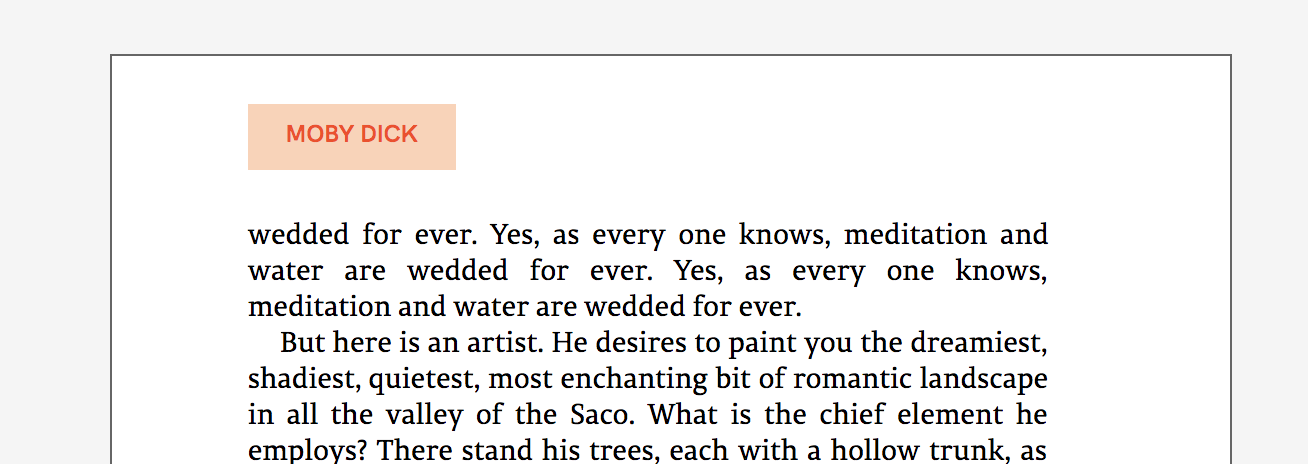
For example, if you use background-color and padding into the at-rules for page-margin box, the style are applied on the margin box.
@page: left {
  @top-left {
    background-color: #ffd2b5;
    color: #fe4017;
    padding: 2mm 5mm;
  }
} ;
Result:
If you want to applied this background-color and padding only on the generated content, you need to applied the style on a special div create by Paged.js: pagedjs_margin-content.
.pagedjs_left_page .pagedjs_margin-top-left .pagedjs_margin-content {
  width: auto;
  background-color: #ffd2b5;
  color: #fe4017;
  padding: 2mm 5mm;
}
Result:
Define width and height of margin boxes
The height and width of the margin boxes are automatically computed by Paged.js (see "Rendering of margin boxes" below) but you can easily define the size you want using relative (%) or absolute values (mm, in, px).
@page {
  @left-top {
    width: 28mm;
    height: 10mm;
  }
}
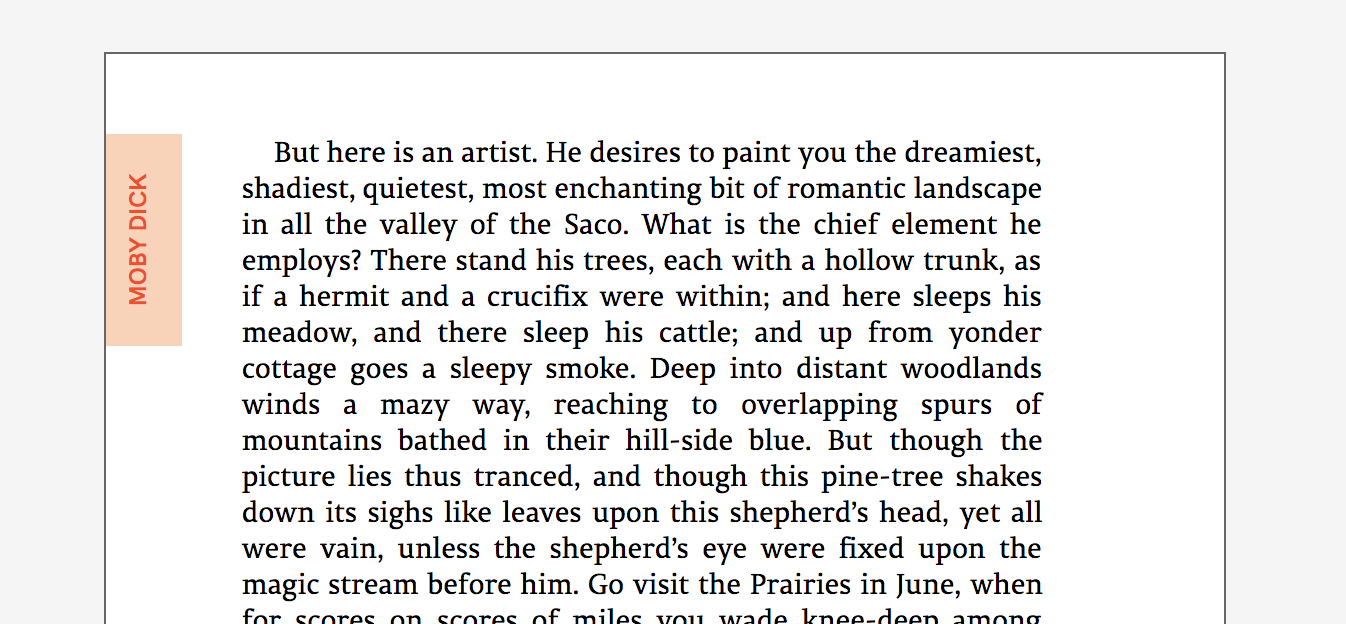
Rotate margin boxes
By using the tranfsorm() property you can easily rotate the margin-boxes of your document
@page {
  @left-top {
    width: 28mm;
    height: 10mm;
    transform: rotate(-90deg);
    transform-origin: top left;
    position: relative;
    top: 28mm;
  }
}
Result:
Rendering of margin boxes with Paged.js
Paged.js use CSS grid and flexbox to create the margin boxes of the page. The figures below represent how margin boxes are placed with the div classes used.
Margin boxes on the page
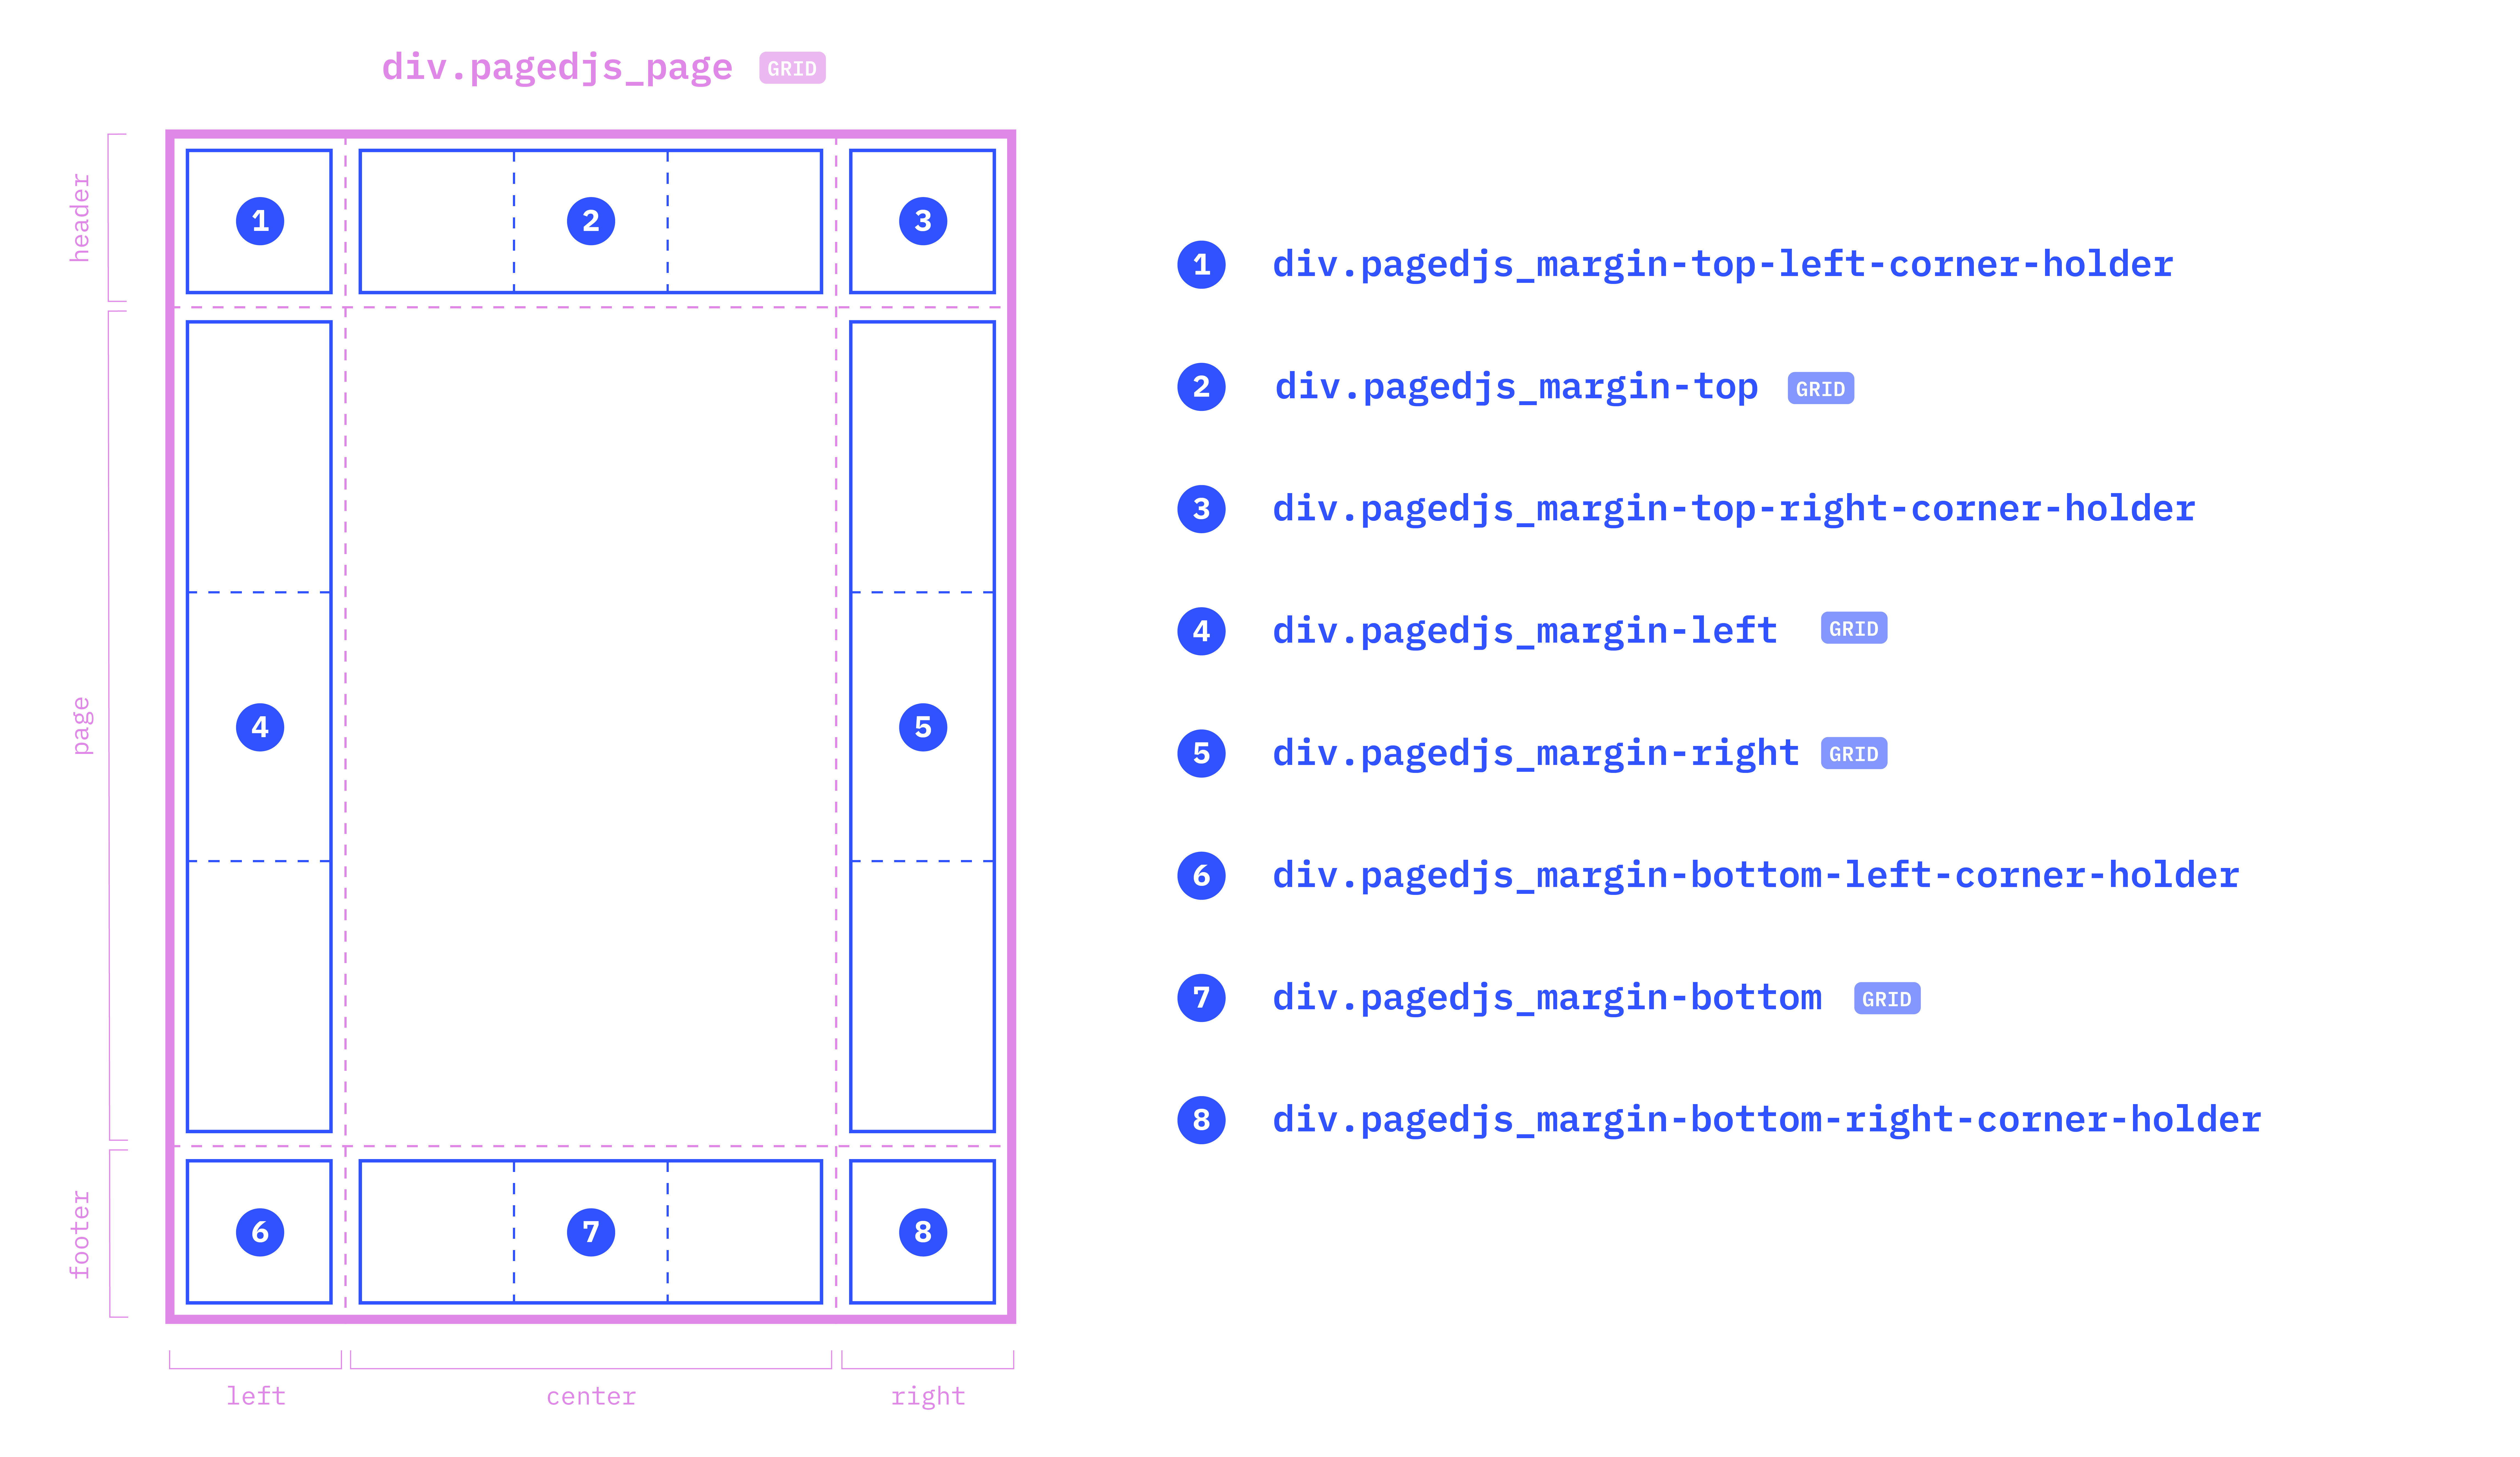
The page consists of four corner margins and four groups of margins placed on a grid with three columns and three rows. The grid use margin variables created by Paged.js based on your margin and page size declarations to set the size of items.
Template of the grid
.pagedjs_pagebox {
  grid-template-columns:
    [left] var(--pagedjs-margin-left)
    [center] calc(
      var(--pagedjs-pagebox-width) - var(--pagedjs-margin-left) - var(--pagedjs-margin-right)
    )
    [right] var(--pagedjs-margin-right);
  grid-template-rows:
    [header] var(--pagedjs-margin-top)
    [page] calc(
      var(--pagedjs-pagebox-height) - var(--pagedjs-margin-top) - var(--pagedjs-margin-bottom)
    )
    [footer] var(--pagedjs-margin-bottom);
}
Classes of the corner margins (and position on the page grid)
-
div.pagedjs_margin-top-left-corner-holder(grid-column:left/ grid-row:header) -
div.pagedjs_margin-top-right-corner-holder(grid-column:right/ grid-row:header) -
div.pagedjs_margin-bottom-left-corner-holder(grid-column:left/ grid-row:footer) -
div.pagedjs_margin-bottom-right-corner-holder(grid-column:right/ grid-row:header)
Classes of the groups of margins (and position on the page grid)
- top page margins:
div.pagedjs_margin-top(grid-column:center/ grid-row:header) - bottom page margins:
div.pagedjs_margin-bottom(grid-column:center/ grid-row:bottom) - left page margins:
div.pagedjs_margin-left(grid-column:left/ grid-row:page) - right page margins:
div.pagedjs_margin-right(grid-column:right/ grid-row:page)
Group of margin boxes
Each margin group contains three margin boxes contained in a single direction grid (horizontal for top page and bottom page margins; vertical for left page and right page margins).
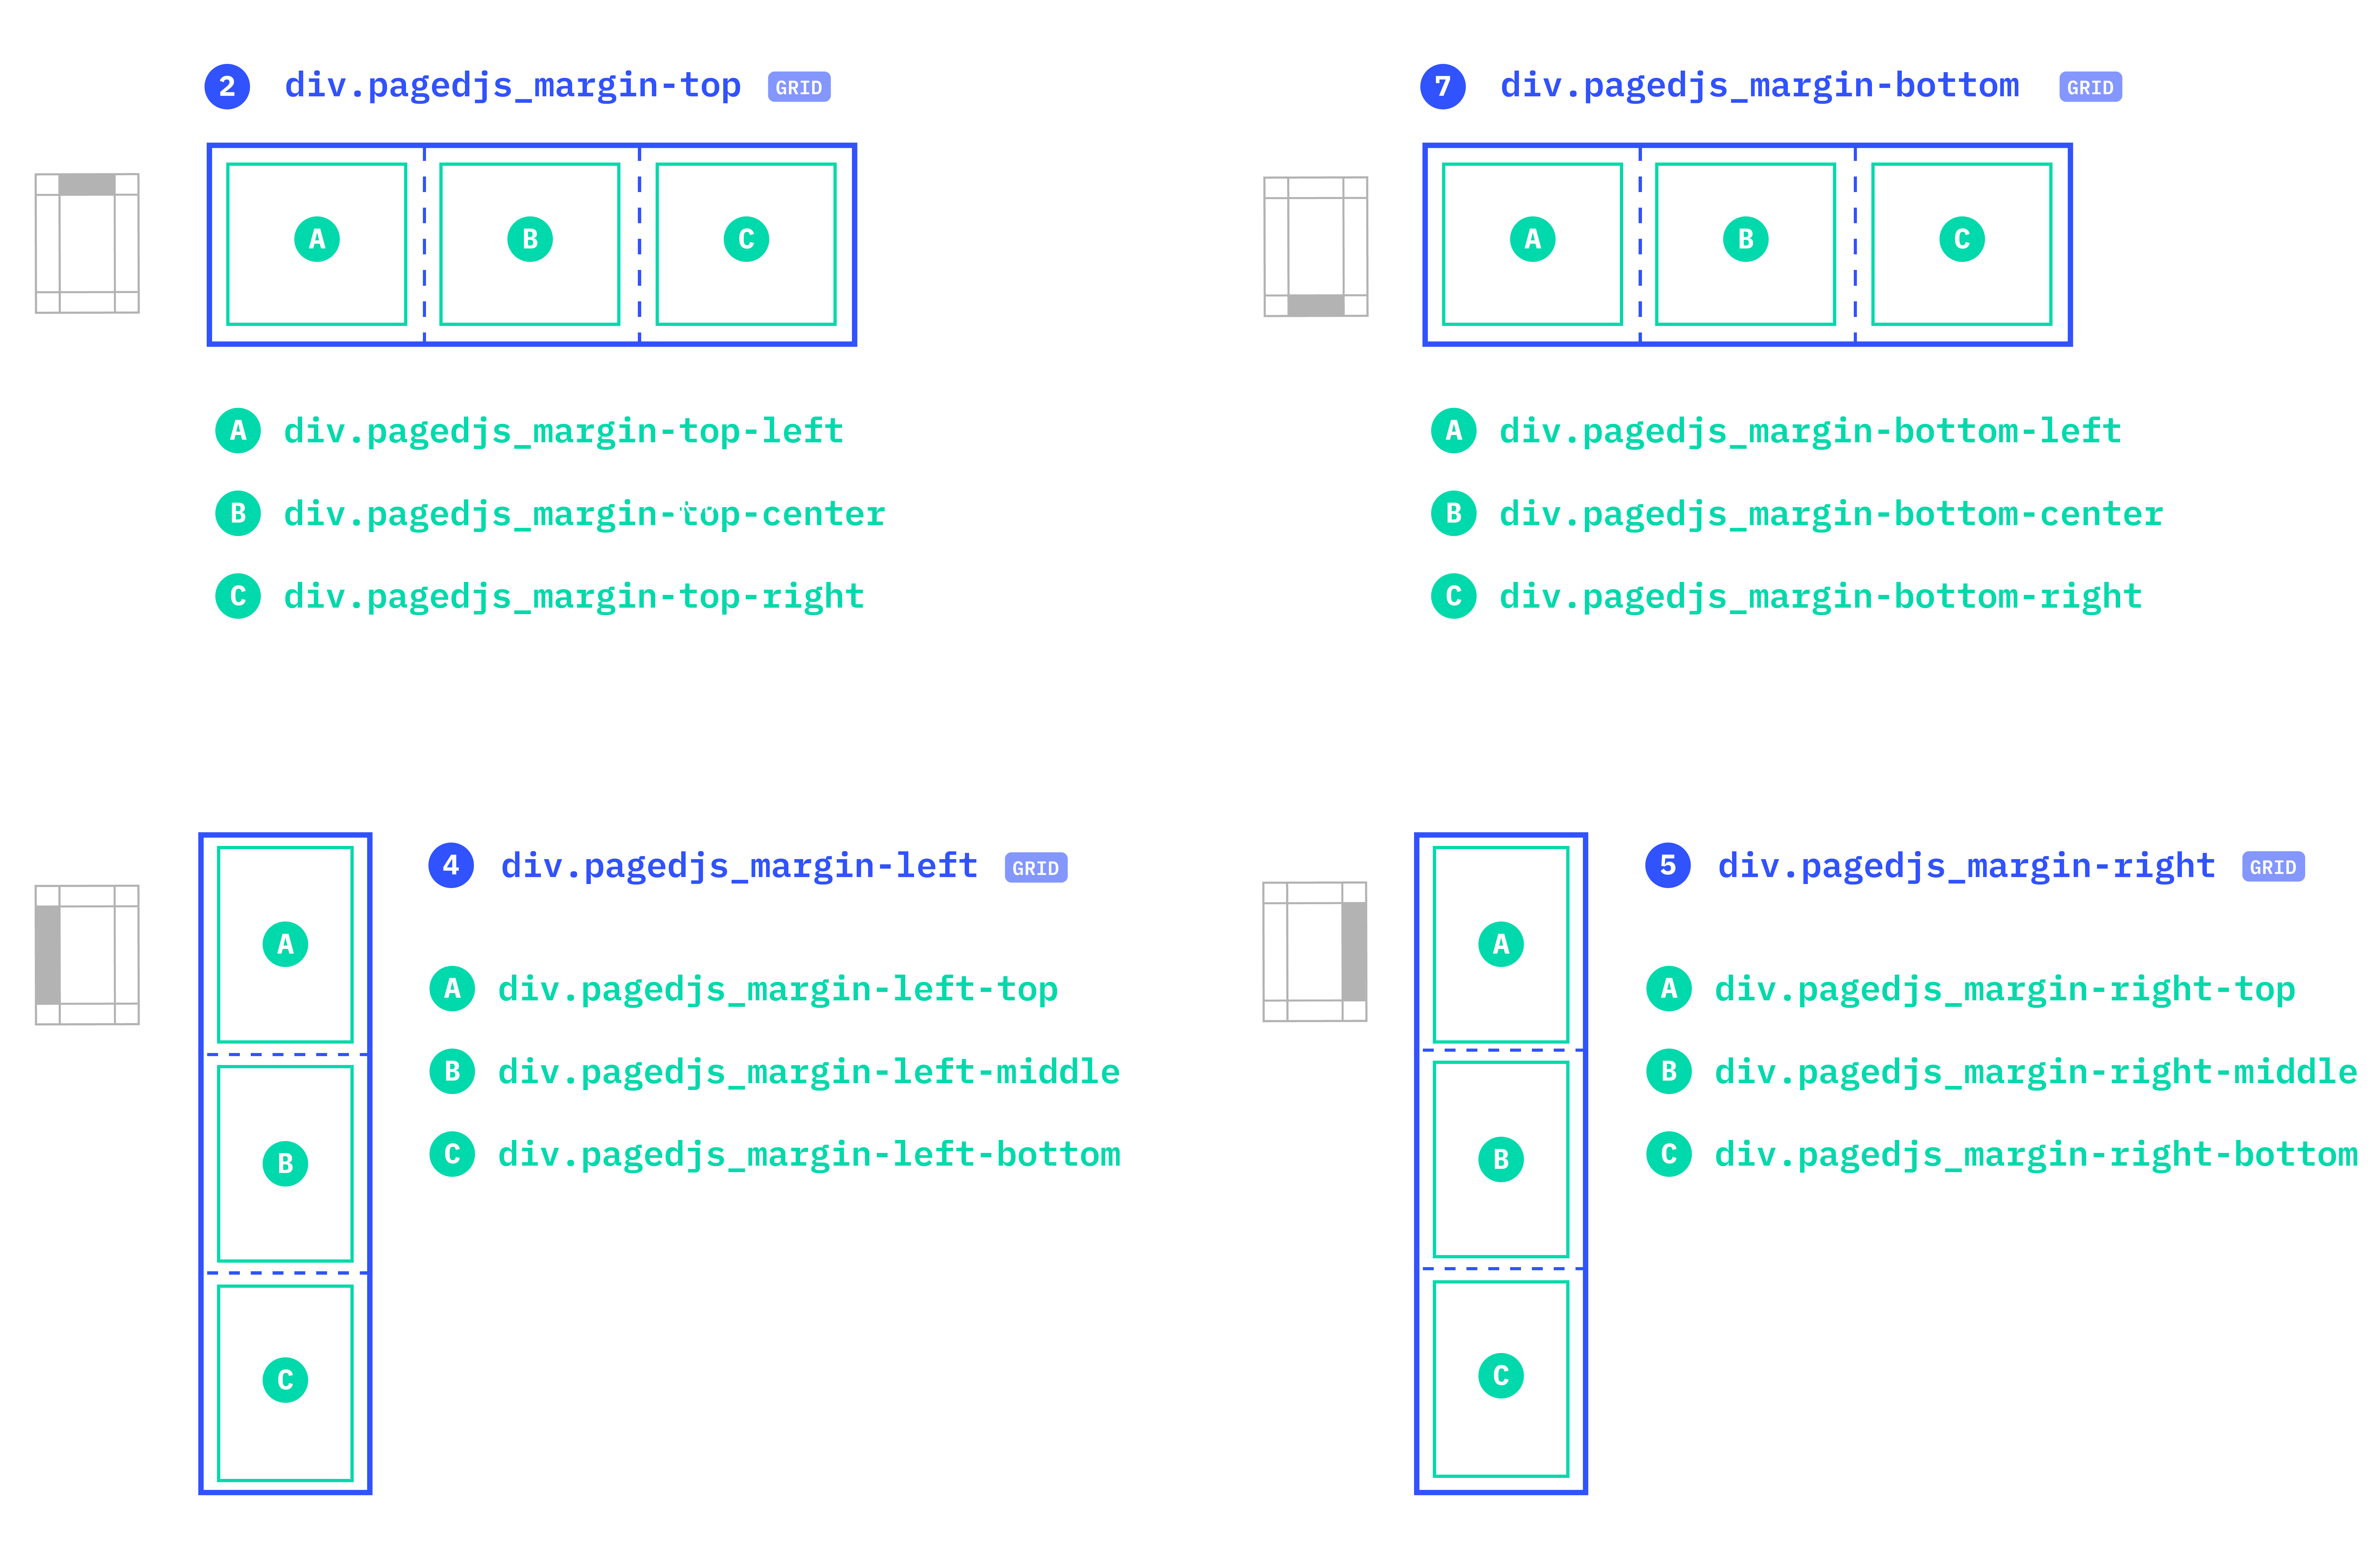
Top page margins
div.pagedjs_margin-top-left(A)div.pagedjs_margin-top-center(B)div.pagedjs_margin-top-right(C)
Bottom page margins
div.pagedjs_margin-bottom-left(A)div.pagedjs_margin-bottom-center(B)div.pagedjs_margin-bottom-right(C)
Left page margins
div.pagedjs_margin-left-top(A)div.pagedjs_margin-left-middle(B)div.pagedjs_margin-left-bottom(C)
Right page margins
div.pagedjs_margin-right-top(A)div.pagedjs_margin-right-middle(B)div.pagedjs_margin-right-bottom(C)
Generated content into the margin boxes
Each margin box is display withflex and contains a div element with pagedjs_margin-content class in which the generated content will be put. For more details see the two parts above: “Styling named string” and “Styling running elements”.
Computation Rules for group of margin boxes
If no definited margin boxes size is set in your stylesheet, the boxes of each margin group are automatically calculated according to the following rules.
- For top and bottom page margins, the height is 100% of the margin box group.
- For left and right page margins, the width is 100% of the margin box group.
Concerning the width of top and bottom page margins and the height of left and right page margins, the computation rules follows the same patterns. This patterns depends on how many margins are generated (populated) in the group – e.g. if content have been set in the at-rules for page-margin boxes.
Here, to explain this computation rules patterns, we use letters corresponding to the three boxes of each group. “Size” correspond to “width” for top and bottom page margins and the “height” for left and right page margins.
If only one margin box are generated
If only one of the margin boxes is generate, the margin box will take the full width/height of the margin group.

If two margin box are generated
If A and C are generated
With no size set: the size of B is 0, A and C are extended over the size of the margin group. Their size is relative to the length of the generated content.

With one size set (A or C): he size of B is 0. A and C are spread over the size of the margin group. The margin box whose size is not set fills the remaining space in the margin group.

With the two size set (A and C): A is aligned on the left of the margin group, C is aligned with the right of the margin group. B takes the remaining space but has no content.

If A and B or B and C are generated
With no size set: the size of the margin-boxes will be relative to the length of the generated content. The one in the center will always be in the middle (“center rule”), i.e. the size of A will always be equal to the size of C.

With one size set (A, B or C): the other two margins bowes (with no size set) will extent the remaining space. The “center rule” remains valid, so the automatic sizes of the two margin-boxes will be distributed according to this rule.

With two size set: the two margin boxes with size set will have the declared size. The third margin box (which has no content) will take the size of the remaining space in the group.

If all margin box are generated
If no size set: the size of the margin-boxes will be relative to the length of the generated content. The one in the center will always be in the middle (“center rule”), i.e. the size of A will always be equal to the size of C.

If one size set (A, B or C): the other two margins bowes (with no size set) will extent the remaining space. The “center rule” remains valid, so the automatic sizes of the two margin-boxes will be distributed according to this rule.

If two size set: the two margin boxes with size set will have the declared size. The third margin box (which has no content) will take the size of the remaining space in the group.

If all sizes set: all margins box have the declared size. They will be aligned on the left for top/bottom page margins and on top for left/right margins.
